"When It's Easy, It's Fun!"

Tuesday, January 27, 2009

How To Form More Advanced Chords Using The Numbers 1 - 7

by Charley Wyser

From a previous post, we learned to form our 4 basic chords - the Major, minor, Augmented and diminished in the key of C.

1)To form a C Major chord (C chord) we play the notes
1 - 3 - 5 (C E G).

2)To play a C minor chord, we play
1 - b3 - 5 (C Eb G)

3)To play a C Augmented chord, we play
1 - 3 - #5 (C E G#)

4)To play a C diminished chord, we play
1 - b3 - b5

For the more advanced chords, I will give you a chart. If you wish,
print out the chart and keep it near you piano or keyboard for
reference.

I am going to introduce a new term to you - "Intervals".

The intervals mean the note numbers in the scale.

Again, we will apply these numbers to the key of C.

Chord -> Interval -> Key of C example

C Major 7 -> 1 - 3 - 5 - 7 -> C - E - G - B

C Dominant 7 -> 1 - 3 - 5 - b7 -> C - E - G - Bb

C Minor 7 -> 1 - b3 - 5 - b7 -> C - Eb - G - Bb

C Minor 7b5 -> 1 - b3 - b5 - b7 -> C - Eb - Gb - Bb

C Diminished 7 -> 1 - b3 - b5 -bb7 -> C - Eb - Gbb -Bbb(A)

You will notice on the Diminished 7 chord there is a Bbb.

This is called a double-flat. This is actually the same as the 6 in
the C scale.

So another way of thinking of the Diminished 7 chord is to play
1 - b3 - b5 - 6

But you would not teach it this way, because technically this is
incorrectly stated.

One interesting thing to note is that each of these four note chords is based on one of
the four basic chords.

The Major 7th and Dominant 7th chords are both based on the Major chord. If you look
closely at the intervals, you will notice that both of these chords contain the
numbers 1 - 3 - 5 (Major chord).

Similarly, you will notice that the Minor 7th chord contains 1 - b3 - 5 (minor chord).

Lastly, both the Minor 7b5 (also called a Half-Diminished 7th), and the Diminished 7th are
both formed from the diminished chord because they contain 1 - b3 - b5.

The top note (7th tone) is going to be what differentiates the more advanced four-note chords
from their basic root chords (Major, minor, Augmented, diminished).

If you are interested in finding out more about chords and how they move, be sure to look at
my program, The Secret 7 Numbers of Successful Piano Playing.

As they say, "A Picture Is Worth A Thousand Words".

Until then, Keep Having Fun!

Charley Wyser
easypiano.com

To view my Free online lessons, click here

To listen to podcasts, click here

Thursday, January 22, 2009

How To Form Basic Chords

by Charley Wyser

There are four chords that are the basic foundation for almost all chords in music as played in the United States and other parts of the world.

Each of these chords consists of three notes. These four chords are the Major, minor, Augmented, and diminished chords.

In this article, you will learn about these chords in the key of C.

You will notice when the four chords were mentioned above, Major and Augmented begin with upper-case letters, and minor and diminished begin with lower-case letters. This is because chords that are Major, or formed from the Major chord start with an upper-case letter, and chords that are minor, or formed from the minor chord are in lower-case.

You will see how this works in just a few minutes.

To begin, let's start by forming a C Major scale.

Think about your younger school days when you learned Do - Re - Mi - Fa - So - La - Ti - Do.

When you sang this, you were singing a Major scale.

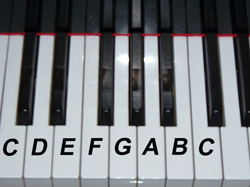
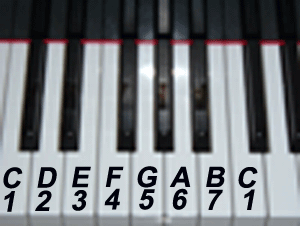
The notes that make up the C Major scale are in the picture below.

What I have done is numbered the tones in the C Major scale from 1 to 7. Many times, you will hear teachers refer to a Major scale as having eight tones. But, if you look closely at the eighth tone, you will notice that it is the same as the first tone.

Therefore, we will re-label it as tone number one.

These tones are going to be important in the formation of our four basic chords.
(the symbol 'b' is a flat. Eb is the same as E flat.)

1) Major chord: 1 - 3 - 5 -> C Major chord = C, E, G
2) minor chord: 1 - b3 - 5 - > C minor chord = C, Eb, G
3) Augmented chord: 1 - 3 - #5 -> C Augmented chord = C, E, G#
4) diminished chord: 1 - b3 - b5 -> C diminished chord = C, Eb, Gb

If you look at the above chart, you will start to see relationships between the four chords. Pay close attention to the 3rd.

In the Major, and Augmented chords, you will see that they both start with the 1 (referred to as the root of the chord), and the 3. This is why they are related. The only thing that changes is the treatment of the 5.

You will notice a similar relationship with the minor and diminished chords. The 3 is now flatted (b3). That is, both the minor and diminished chord begin with the root and the flat 3. Again, this is why they are related.

We covered these four basic chords in the key of C. Remember, in music, you should become familiar with these chords in all twelve keys. Becoming familiar with these chords will carry you a long way in your musical endeavors.

In my program, 4 Chords You Need To Know, you will learn these chords in all twelve keys. You will also learn how to apply them to songs, and learn shortcuts for figuring out any of these chords in matter of seconds in any key (even if you have never played them in that key before).

Until next time, continue to have fun on your piano journey!

Charley Wyser
www.easypiano.com

To view my free online lessons, click here

To listen to podcasts, click here


Wednesday, January 21, 2009

How Do I Find Time To Practice?

For many, you want to learn how to play piano or improve your playing, but do not have a lot of spare time for practicing. Or at least so you think.

According to some experts, if you take 24 hours a day and multiply that by 7 days a week, you have 168 hours of time each week. If you subtract a 40 hour work week and 56 hours a week of sleeping, there are still 72 hours a week left for other things.

This leaves us approximately 10 hours a day to do our other duties. This is of course purely theoretical. As I am sure you are aware of, most things in theory do not work the same way in reality.

So, the question becomes, how can we take advantage of some of this time for our piano ambitions?

You know as well as I, that Time is one of our major stressors in life. Well, to remind you, playing piano should be fun, and not stressful.

How do we keep this fun?

By remembering a lot can be accomplished in Little Bits.

Consistency is the key here! Can you find 5-10 minutes a day? You will be amazed at what you can accomplish in this little time frame each day. Not only that, each of those days you spend this time practicing ads up. For example if you practice 10 minutes a day over 10 days, you have practiced for 100 minutes. In other words, you have practiced for 1 hour and 40 minutes.

You will be amazed at the kind of progress you will make practicing in this manner. I even have one student that is now getting up a few minutes earlier to do this. The best part about this is she's making good progress.

Some of you may have more than the 5-10 minutes a day I mention here. If so, that is great!

The main thing to remember is consistency. Practicing a little consistently will be more effective that practicing a lot here-and-there over the long run.

Again, remember to keep your practicing fun and enjoyable!

I hope you have enjoyed this article.

Talk to you soon,

Charley Wyser
http://www.easypiano.com/

"Now is always a good time to start!"

If you would like to check out all of my podcasts, click on one of the links below:
To access with iTunes
To access with Odeo (odeo/a899ff8db4f63f39)
To access with Podcast Alley

direct access to the RSS Feed

http://easypiano.com/eppodcast/pianolessons.rss

Tuesday, January 20, 2009

Play Piano: How To Recover From A Mistake

Many that I talk to about their piano playing say that a very big fear is performing in front of others. Not only that, another huge fear is making a mistake when they are playing.

The question now becomes, how do you recover when you make mistakes?

Conventional wisdom tells us to keep playing, as if nothing happened. But, you know as well as I, that when you do make a mistake, the natural tendency is to stop and make a correction.

This is a very hard habit to break, and it does take quite a bit of practice to conquer this bad habit.

There are many ways to deal with mistakes. To avoid becoming overwhelmed by this, we will focus on a few.

I believe it was the great jazz trumpeter, Dizzy Gillespie that said "there are no wrong notes". I believe another jazz legend, John Coltrane said "you are only a half-step away from the right note".

Both of these statements bring up a very important point. You must change your way of thinking when playing in front of others.

When you perform, do not think of making mistakes. Instead, just think of having fun.

Let's face it. Mistakes happen. The best players even make mistakes. And, to the surprise of many, they can even make a lot of mistakes during the course of a song.

But, if you are listening when a mistake is made, you are not able to tell most of the time.

Let's look at a couple of solutions that many jazz players use to cover themselves.

Musicians from other genres of music may use these techniques also. But, since I am a jazz musician, I will use this reference.

The first solution is a very simple one. When you are playing, and hit a bad note, or group of notes, play the exact same note or group of notes again.

When you do this, the note(s) you play, sound like a definite idea. That is, it sounds as if you intended to play the note(s).

Not only that, when you listen to recordings, and hear musicians do this, you may notice that these ideas can be some of the most profound you will hear.

Now, that this secret has been exposed, you will probably be surprised at how often this happens.

Go back and listen to some of your favorite recordings.

You will soon discover that many of the people you think of as being great, use this technique frequently.

Another technique that works really well is to slide down, or go up a half-step from the first note you play, or the last note you hit.

Sometimes, you may start or end a tune on the wrong note.

Remember, you are only a half-step away from the right note.

So, if you accidentally start on the wrong note, try sliding your note a half-step down, or go up a half-step to play the note that you originally intended.

Similarly, if you end an idea on the wrong note, try going up or down a half-step from there to get to the note you wish to play.

To add another twist, try combining both of these techniques.

In other words, try going up or down a half-step to begin or end on the note you intended, and then play the entire idea again.

Until next time, continue to have fun on your piano journey!

To view my free online lessons, click here

If you would like to check out all of my podcasts (audio lessons online), click on one of the links below:


To access with iTunes
To access with Odeo (odeo/a899ff8db4f63f39)
to access with Podcast Alley

direct access to the RSS Feed
http://easypiano.com/eppodcast/pianolessons.rss

Have Fun!

Charley Wyser
easypiano.com

Monday, January 19, 2009

Performing Piano: How To Deal With Nervousness, Part 2

In part 1 of this article on dealing with nervousness, we discussed totally immersing yourself in your playing.

In part 2, we will talk about practicing as a way to deal with nervousness.

Let's use one of the techniques from a previous article that dealt with practicing to perform.

When I first started playing professionally, there was a ritual for me to go through to prepare for a performance. I would practice scales, arpeggios, and other technical studies to get my fingers "warmed-up", and mentally prepare for the gig.

What was discovered is that my nerves did not calm down, and it was difficult playing a lot of musical ideas on the piano.

Then, one day, after reading an article in a jazz magazine, I started practicing a new way - "practicing to perform".

To summarize, whenever you practice, pretend you have an audience watching you. In other words, pretend you are performing "live".

To have even more fun, exaggerate your performance.

For example, try standing in a room other than where your piano or keyboard is located.

Next, pretend you are being introduced. Then, make your grand entrance in the room with the piano, sit down and "go for it". Remember, as soon as you start playing, it is important not to stop for any reason.

When you finish playing a song, actually hear you audience clapping and whistling for you. Then, take a brief pause to acknowledge this appreciation. After this, proceed with the rest of your concert.

Stand up and take a bow when your concert is over.

This may sound a little crazy to you, but you will be amazed at how effective this strategy is.

Take advantage of your "big" imagination. If you are saying, "yeah right, what imagination", use this as an opportunity to re-discover yourself.

Practicing to perform may perform miracles for you as it did for me.

This technique is so strong, that when you are actually performing, it begins to feel as though you are only practicing.

In turn, this greatly reduces the nervousness you feel.

Until next time, continue to have fun on your piano journey!

To view my free online lessons, click here

If you would like to check out all of my podcasts (audio lessons online), click on one of the links below:

To access with iTunes
To access with Odeo (odeo/a899ff8db4f63f39)
to access with Podcast Alley

direct access to the RSS Feed
http://easypiano.com/eppodcast/pianolessons.rss

Have Fun!

Charley Wyser
easypiano.com

Friday, January 16, 2009

Performing Piano: How To Deal With Nervousness, Part 1`

Recently, I had an email from someone looking for advice in trying to deal with nerves while performing.

Let's try to expel one big myth - people that have been playing and performing for years do not get nervous.

Most people I know, including myself, still get nervous when performing. In some situations, these nerves can be tremendous.

Over time, you just learn different ways to cope with nerves.

You do not have to be performing in front of large groups to experience this sense of nervousness.

For many, just playing in front a one or more people can trigger these feelings.

So, what is a good way to learn to deal with these nerves?

First, focus on yourself, and not on the people that are listening to you.

In the beginning, this is a lot easier said than done.

When I perform, I look at, speak to, and smile at my audience. But, when I sit down to play, I focus on my playing.

When you start playing, totally immerse yourself, and forget about the people watching you. If you have to, hit the notes a little harder.

The key is to express yourself. Have Fun! When you do this, you are focusing on you, and not your audience.

Forget about making mistakes. Again, have fun when you are performing!

There is a second myth floating around - Professional Musicians do not make mistakes when they perform.

To be honest with you, pros make quite a few mistakes when they perform. You cannot avoid this because you are human.

The difference between pros and amateurs is when mistakes are made, they are seen as opportunities. But, we will address the idea of capitalizing on mistakes in a future article.

Now, getting back to the matter at hand - dealing with nervousness. When you totally immerse yourself in your playing, many times, you will forget that your audience is even there.

At this point, your music has become the dominant theme, and not the audience.

In the next article, Performing Piano: How To Deal With Nervousness, Part 2, we will take a look at a second technique you can use that is a lot of fun.

Until then, have fun on your journey to becoming a better piano player.

If you would like to check out all of my podcasts (audio lessons online), click on one of the links below:

To access with iTunes
To access with Odeo (odeo/a899ff8db4f63f39)
to access with Podcast Alley

direct access to the RSS Feed
http://easypiano.com/eppodcast/pianolessons.rss

Have Fun!

Charley Wyser
easypiano.com

Thursday, January 15, 2009

Two Ways To Practice Piano – Part 2

We are going to focus on the second way of practicing that was outlined in the previous article.

Remember, one of the main goals to strive towards when playing, is to be able to play without having to do a lot of thinking. That is, getting our playing on "automatic pilot".

This second way of practicing will help you attain this goal faster. This practice technique is called "Practicing to Perform".

When I originally starting performing professionally, practicing the scales, arpeggios, and other technical studies would be the norm. But, what I noticed was that nervousness would be overwhelming. Not only that, the songs played, and the improvisations did not sound all that great.

It was at this point that I started practicing to perform. In other words, when I would sit at the piano, I would pretend there was an audience of 5,000 people that had paid big bucks to see me play.

Now, the setting was different, and everything was on the line. My practicing was taken to a whole new level.

Here are six steps you can follow to get started with this method.

1) Have a list of several tunes you want to practice (2 - 8 would be sufficient).

2) As you approach the bench, look beyond the piano and pretend your audience is excited and waiting.

3) This next step is extremely important. Pretend that you are the best pianist in the world!

4) When you play, do not stop for mistakes, rhythm-blotches, or anything else. This will upset your audience if you do. Not only that, but you will actually learn to create some interesting new ideas from your mistakes on the fly. This is helpful, because contrary to public opinion, musicians make lots of mistakes when they play. They are just "creativity experts" in dealing with them.

5) After you finish playing a tune, immediately go to the next. Do this until you have played all of the songs on your list.

6) When you have finished your mini-concert, stand up and take a bow if you wish.

As you can see, with this method, there is a lot of imagination involved. There are many different advantages using this method.

First, when you actually perform in front of an audience, it feels like you are practicing! You will still be a little nervous, but not as much. Your performance anxiety will be much less.

Secondly, you will notice that your confidence level goes up a lot.

Thirdly, you will not be as hesitant when someone asks you to play something.

Fourthly, your songs and playing will begin to sound much, much better!

These are just a few of the benefits you will receive when practicing to perform. I am sure you will think of many more benefits as you apply this practice technique.

Until then, have fun on your journey to becoming a better piano player.

If you would like to check out all of my podcasts (audio lessons online), click on one of the links below:

To access with iTunes
To access with Odeo (odeo/a899ff8db4f63f39)
to access with Podcast Alley

direct access to the RSS Feed
http://easypiano.com/eppodcast/pianolessons.rss

Have Fun!

Charley Wyser
easypiano.com

Wednesday, January 14, 2009

Two Ways To Practice Piano – Part 1

There are many different ways to practice. Your practicing should be based on what you want to accomplish.

For me, I practice to become proficient at a tune as quickly as possible. This means being able to play the song without thinking about what I am doing. That is, with less thinking, improvisation and playing what I am hearing inside of my head become a lot easier and more fun.

“When you free the mind, the ears become available”.

If this happens to be one of your goals, how can you accomplish this?

The two ways I have found effective are:
1) Stopping after mistakes
2) Practicing to perform

Let’s focus on the first topic – Stopping after mistakes.

We all think about and become frustrated when making mistakes. One thing you should know is that you will always make them. This is especially true after you attain the professional level.

Mistakes, truth be told, are opportunities. What is meant by this? When you are performing in front of an audience or recording at a studio and make a mistake, you must, and I repeat must, think fast and be very creative. Once you can do this, most will not realize that you made a mistake.

Over all the years of playing, I have found that some of my best and most creative ideas have come as a result of making mistakes.

Now, let us get back to our first method of practicing. When you are playing and make a mistake, stop playing. Now, go back to this section of the song, and only play this section over and over again until you feel comfortable with it.

Once you feel comfortable with this section, start the piece over from the beginning and play all the way through until you make another mistake. When you make another mistake, go through the same steps. That is, stop, isolate this section, and play this section over and over until you are comfortable. Then, once again, start from the beginning of the piece, and play all the way through again.

As you can see, this process takes time. So, always take your time, and never be in a hurry to practice.

Experiment with this method of practicing and see how you like it. But, remember to always keep it fun. You will see good progress if you enjoy what you are doing.

In the next Piano Fun Talk article, we will focus on the second way of practicing.

Until then, have fun on your journey to becoming a better piano player.

If you would like to check out all of my podcasts (audio lessons online), click on one of the links below:

To access with iTunes
To access with Odeo (odeo/a899ff8db4f63f39)
to access with Podcast Alley

direct access to the RSS Feed
http://easypiano.com/eppodcast/pianolessons.rss

Have Fun!

Charley Wyser
easypiano.com

Tuesday, January 13, 2009

How to Play Piano by Ear - Basic 12 Bar Blues lessons Podcast

One of the most fun and interesting ways I have found teaching new students over the past many years is by using the basic 12-bar blues progression.

This progression is very easy to learn because it uses only three basic chords, and the sound is easily recognizeable. Most people that I have taught this to always comment "I've heard this many times before."

Not only is this progression easy to learn, but it is also easy to teach.

The best part about the blues is that you can do a ton of things with it to make it sound very interesting while still being very easy to play.

I have put together a podcast in a series of podcasts entitled "Piano Lessons: Basic Blues in the Key of C" that teaches you this progression.

To access this podcast
click here


To access this podcast through PodcastAlley.com
click here


To access through Odeo.com
My Odeo Channel (odeo/a899ff8db4f63f39)


To access this directly through iTunes
click here


Charley Wyser
easypiano.com

Secrets of the Pros Piano Lesson Podcast

I have been playing and teaching piano for many years.

It is always interesting to get ideas on what playing the piano really is. Many people I come in contact with are under the impression that playing the piano means reading music.

Reading music is a form of communication. In other words, if there is a song I want you to learn, one of the ways to get this tune to you is to write the music out and give it to you. Other ways of communicating this new song idea to you are giving you a CD or tape, as well as just sitting down and teaching it to you.

Playing, on the other hand, is actually learning your instrument. This requires a lot of creativity and exploration. Watching other pianists or keyboardists perform, learning tunes by ear, learning all of the theory you can, and just researching all you can about the piano or keyboard are ways to improve your playing.

There are many other ways also. You are only limited by your imagination.

My new podcast is going to be a series of piano lessons that deal with all aspects of professional playing.

This podcast will be for all levels from the absolute beginner to the pro. New episodes should be coming out frequently so please be sure to subscribe.

The first episode deals with finding and identifying the notes on the piano and learning three basic chords.

Other episodes coming will deal with learning chords, bass lines, playing in different keys, and much more.


To access this podcast click here


To access this podcast through PodcastAlley.com
click here


To access through Odeo.com

My Odeo Channel (odeo/a899ff8db4f63f39)


To access this directly through iTunes
click here

Charley Wyser
easypiano.com

Sunday, January 11, 2009

How To Play Simple Melodies Using the Major Scale


by Charley Wyser

In the last lesson, we learned how to form a major scale in the three basic keys - C, F, and G.

This lesson will teach you how to create simple melodies in these keys. Although these melodies are very easy to learn, it is the concept that you should focus on.

Let's start with the key of C. To refresh your memory, look at the picture of the C scale below.


The notes in the C scale are C, D, E, F, G, A, B, and C.

You have noticed numbers under each of these notes. These numbers make it easy for us to get around in any key we are playing in. All I have done is numbered the notes in the C scale from 1 to 8. You will notice that after the 8, there is a 1 in parenthesis. The reason for this is that 8 is the same note as 1. So you can use either.

For this lesson, let's use our right hand and number our fingers from 1 to 5. The finger numbers are as follows: thumb (finger 1), pointer finger (2), middle finger (3), ring finger (4), and little finger (5).

Let's place our right hand on the piano or keyboard with our fingers in a certain order.

The thumb (finger 1) should be placed on C, finger 2 on D, finger 3 on E, finger 4 on F, and finger 5 on G. In other words, fingers 1-2-3-4-5 are placed on notes 1-2-3-4-5 (C, D, E, F, G).

To learn our tunes, we will refer to the notes by using the numbers instead of their letter names. This is important, because these numbers allow us to play tunes in any key. You will soon see the value of this as you play these tunes in the keys of F, and G.

Let's get started!

Play the numbers in each of the tunes below in the orders listed.

Tune 1 - Hot Cross Buns

3 -> 2 -> 1 (hold 1 a little longer)

next
3 -> 2 -> 1 (hold 1 a little longer)

then
1 -> 1-> 1-> 1 ->2 ->2 ->2 ->2

last
3 -> 2 -> 1 (hold 1 a little longer)


Tune 2 - Jingle Bells

3 -> 3 -> 3 (hold 3 a little longer)

next
3 -> 3 -> 3 (hold 3 a little longer)

then
3 -> 5-> 1 (hold a little longer)-> 2 ->3 (hold a little longer)

then
4 -> 4 -> 4 -> 4

then
4 -> 3 -> 3

then
3 -> 3 -> 3 -> 2 -> 2 -> 3 -> 2 (hold a little longer) -> 5

next
3 -> 3 -> 3 (hold 3 a little longer)

next
3 -> 3 -> 3 (hold 3 a little longer)

then
3 -> 5-> 1 (hold a little longer)-> 2 ->3 (hold a little longer)

then
4 -> 4 -> 4 -> 4

then
4 -> 3 -> 3

then
3 -> 3 -> 5 -> 5 -> 4 -> 2 -> 1 (hold a little longer)

As you play these tunes, you will start to recognize them by sound. Play these notes to the rhythms you already know whenever you sing these tunes.

So as you can see, playing by numbers can actually make things a lot simpler!

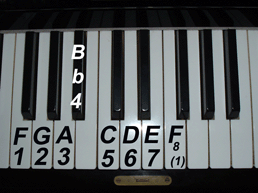
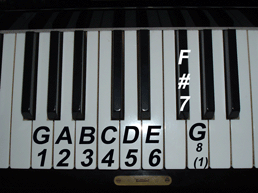
Below are pictures of the F major scale with the note numbers, and the G major scale with the notes numbered.

Try playing these same two tunes in the keys of F and G.


In the next lesson, we will learn some basic chords, and learn how to apply them to the tunes we just learned.

If you would like to learn more about this subject, be sure to check out my program, "The Secret 7 Numbers Of Successful Piano Playing, by clicking here.

Have Fun!


Charley Wyser
easypiano.com

How to Play A Major Scale

By Charley Wyser

One of the most powerful concepts to learn in music is that of the major scale.

Let’s take our last two lessons and combine them to learn the major scale. To refresh, the first lesson was on half steps (sharps and flats), and lesson 2 focused on whole steps.

What is a major scale, and why is it important? When you hear people talk about playing a tune in a certain key, they are referring to the major scale. If you go back to your elementary school days, you probably learned how to sing "do-re-mi-fa-so-la-ti-do".

When you sing this, you are actually singing a major scale. When you sing any song in a certain key, you are picking a note to start on and singing "do-re-mi-fa-so-la-ti-do".

This will become clearer as we go deeper into this lesson.

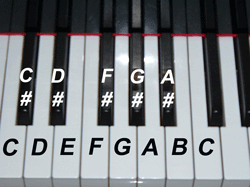
To see how this works, start on the note C. If you sing "do-re-mi-fa-so-la-ti-do", you will discover that your notes are C (do), D (re), E (mi), F (fa), G (so), A (la), B (ti) and C (do).

Notice how all of your notes are white keys. This means that we are playing in the key of C. So, when a song is written in the key of C, it has no sharps or flats in the key. Take a look at the picture below.


  • C to D = whole step
  • D to E = whole step
  • E to F = half step
  • F to G = whole step
  • G to A = whole step
  • A to B = whole step
  • B to C = half step
Based on this, we now have a system for learning a major scale in any key. Our formula is as follows (w = whole step, h = half step):

Starting note + w + w +h + w + w + w + h

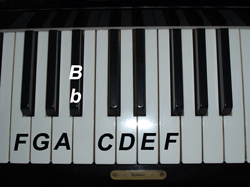
Using this formula, we can start on any note and instantly play a major scale. For example if we want to play an F major scale, our notes would be: F (starting note), G, A, Bb, C, D, E, and F.

  • F to G = whole step
  • G to A = whole step
  • A to Bb = half step
  • Bb to C = whole step
  • C to D = whole step
  • D to E = whole step
  • E to F = half step
Look at the picture below.


Let’s practice on one more scale – the G major scale. Our notes in the G major scale are G, A, B, C, D, E, F#, and G.

  • G to A = whole step
  • A to B = whole step
  • B to C = half step
  • C to D = whole step
  • D to E = whole step
  • E to F# = whole step
  • F# to G = half step
Look at the picture below.


In order to really get in and understand how music works (theory) we must really become familiar with the major scale. This is a process that is done over time, not in one evening as many would lead you to believe. But, as usual, this learning process should be fun!

In the next lesson, we are going to learn how the major scale can be used to play simple kid’s melodies. As you start to understand this concept, you will also see how the major scale can be used to play even the most advanced melodies.

If you would like to check out all of my podcasts (audio lessons online), click on one of the links below:

Have Fun!

Charley Wyser
easypiano.com


How To Play Whole Steps On The Piano

by Charley Wyser

In the last lesson, you learned about half-steps, sharps and flats. This lesson focuses on whole steps. A whole step is the distance from one key to the next with one key in between. Or another way of looking at it is a whole step equals two half-steps. For example, if you go from C to D, this is a whole step since there is a key (Db) in between the two.

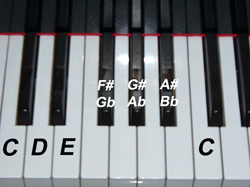
Lets look at the pictures below and familiarize ourselves with whole steps.


If we start on C, going up a whole step would be to the note D. The other whole steps are:

  • D to E
  • E to F#
  • F# to G#
  • G# to A#
  • A# to C

If we go down starting on C, a whole step down would be Bb. The other whole steps are:

  • Bb to Ab
  • Ab to Gb
  • Gb to E
  • E to D
  • D to C

Remember, the black keys have two names associated with them. We could have easily referred to the black keys by their sharp or flat names.

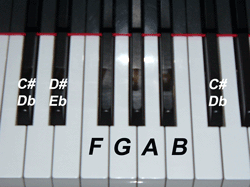
What you will notice is that when we start on C and go up or down in whole steps, we only cover six keys. As you may recall, there are actually twelve keys in music. So, to cover the other six keys, we will start on C#(Db). Look at the picture below.


If we start on C#(Db) going up a whole step would be to the note D#. The other whole steps are:
  • D# to F
  • F to G
  • G to A
  • A to B
  • B to C#

If we go down starting on Db(C#), a whole step down would be B. The other whole steps are:

  • B to A
  • A to G
  • G to F
  • F to Eb
  • Eb to Db

Again, remember that we could have easily called the black keys by their sharp or flat names.

In our next lesson, we will combine whole steps and half-steps to form a major scale.

If you would like to check out all of my podcasts (audio lessons online), click on one of the links below:

Have Fun!

Charley Wyser
easypiano.com

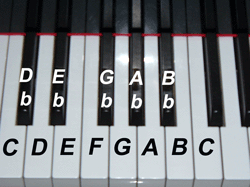
How To Play Half Steps, Sharps And Flats On The Piano

by Charley Wyser


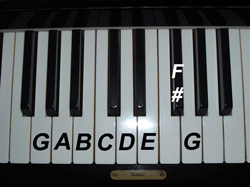
Once you have learned the notes on the piano, it is very important to learn about half steps and whole steps. As a refresher, the piano consists of black keys and white keys. When using the black keys as a reference, you will notice that the black keys are divided into sets of two black keys grouped together, and three black keys grouped together. By the sets of two black keys are the notes C, F, and G, and the notes by the three black keys are F, G, A and B.

If you would like more detail on the note names, please access my podcast: Piano Lessons: Learning Notes and Basic Chords in Key of C

Our next step is to now become very familiar with half steps.

These are easy to remember. A half step is the distance from one key to another with no keys in between. For example if you play C, and play the very first key higher (the black key to the right), this is a half step up. As you see, there are no keys in between these two notes.

If you play C again, then play the first note to the left (the white key – B), this is a half step since again, there are no keys in between.

Learning Sharps

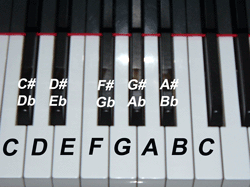
Lets focus on going up the keyboard (to the right). We are going to learn the sharps on the piano. First, start on C. Half step up from C would be C sharp, half step up from C sharp is D. The symbol that is used for a sharp in music is the # . Hence, C sharp = C#.

The keys, including all of the sharp keys starting on C and going up are:C, C#, D, D#, E, F, F#, G, G#, A, A#, B, and C (first C higher than middle C)


So you can see that your black keys are C#, D#, F#, G#, and A#. There are also white keys that are sharp – B# (same as C) and E# (same as F). These white sharps are very seldom referred to by this name. They would only go by this name depending on what key that you are playing your tune in.

The important point to remember is that sharps are to the right of the note.

Learning Flats

Flats are easy because they are the opposite of sharps. All you need to remember is that flats go down (to the left) instead of up.

Lets start on the C that is the first one higher than the middle C, and go down in half steps. The notes are:C, B, Bb, A, Ab, G, Gb, F, E, Eb, D, Db, and C (middle C).

The symbol that is used for a flat is a “b”. Hence, going down, your notes are C, B, B flat, A, A flat, G, G flat, F, E, E flat, D, D flat, and C. C).


The flat keys that are black are: Db, Eb, Gb, Ab, and Bb. Again, as with the sharp keys, there are also white keys that are flat – Cb (same as B) and Fb (same as E). These white flats are very seldom referred to by this name. They would only go by this name depending on what key that you are playing your tune in.

You probably noticed that the sharp and flat keys are the same notes but have different names. The technical term for this is called enharmonic notation. All you need to remember is that :


C# and Db are the same
D# and Eb are the same
F# and Gb are the same
G# and Ab are the same
A# and Bb are the same


It is either called by its sharp or flat name depending on what key you are playing the tune in. We will get into the different keys (key signatures) in future lessons.

Well, this is enough information for right now. In our next lesson, we will cover whole steps.

If you would like to check out all of my podcasts (audio lessons online), click on one of the links below:


Have Fun!

Charley Wyser
easypiano.com